Description
The BJOY Ring Wireless mouse emulator is a device that behaves like a conventional mouse. It is specially designed to adapt to the controls of a wheelchair, using the inclination of the chair’s joystick to move the cursor and external switches to perform the normal functions associated to a mouse’s clicks.
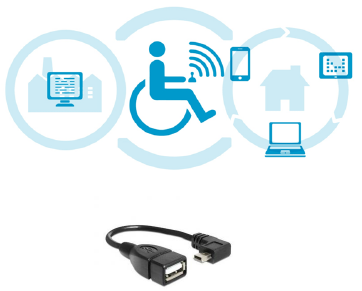
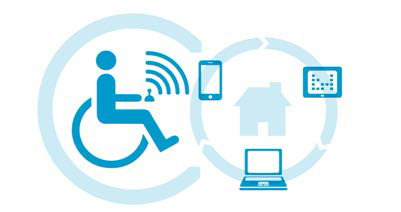
BJOY Ring wireless is aimed at users who use a wheelchair and want to access their computer and/or compatible mobile devices (smartphones and tablets).
Main features:
- Non-invasive and easy to install.
- Adapts to the assembly position and to the user’s mobility by calibration.
- Automatic recognition of the assembly inclination at the time of the connection. It can be installed in an inclined position up to 45º.
- Compatible with all wheelchair models.
- Two customisable input switches to perform the functions associated to the mouse clicks.
- One of the switches allows for the cursor movement to be disconnected.
- Configurable and customisable operation using the configuration software supplied with the product.
- BJOY Ring wireless can be configured on start-up and all the parameters are saved to the device. This facilitates its use on different computers and mobile devices with no need to reconfigure it.
- Access up to 4 devices simultaneously with the same emitter.
- BJOY Ring wireless can also operate as a wired device.
The BJOY Ring wireless mouse is made up of the following parts:
- Ring
- Protection cover
- Emitter
- Receiver
- Assembly spanner
- Extension USB cable (1.5m long) with cradle
- Micro USB cable for charging
- USB type power supply
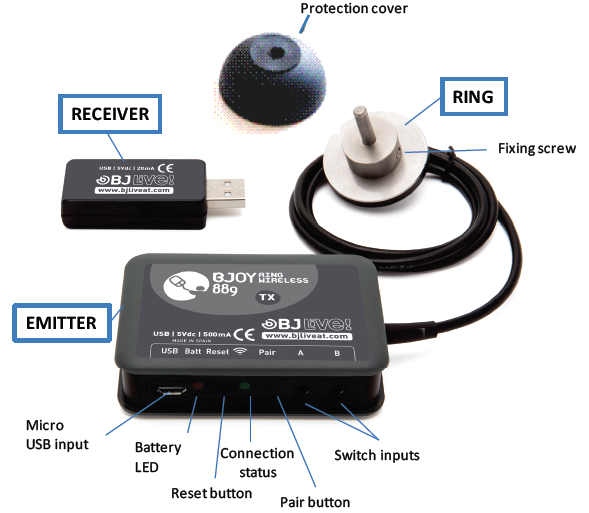
Fig. 1. Parts of the BJOY Ring Wireless.
IMPORTANT: Before using the mouse the wheelchair must be disconnected
Device assembly
Assembly of the Ring
In order to assemble the Ring you must follow these steps:
STEP 1.
Take the handle off the wheelchair joystick and the protective hood if any.

STEP 2.
Insert the ring.
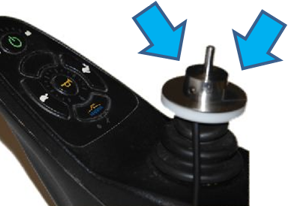
The optimum position for assembling the ring is with the tightening screw in the chair’s forward direction.
In the case that it can not be set up in the optimum position, it is VERY important that the ring is set up in positions with 90º turns in relation to the chair’s forward position.
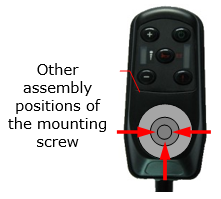
If it is set up in different positions the mouse will not respond properly.

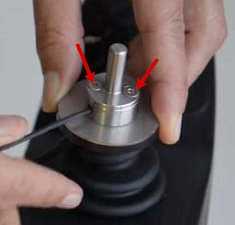
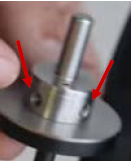
STEP 3.
Tighten the mounting screw using the spanner provided with the device. It is important not to force the tightening screw.
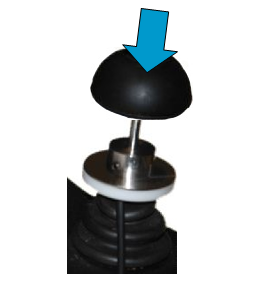
STEP 4.
Put on the protective hood. It is important to always put on the protective hood.
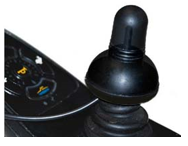
STEP 5.
Reassemble the joystick handle onto the wheelchair.
It is recommended to use assembly inclinations of under 45º.
Assembly of the Emitter
Emitter and receiver are communicated via Radio Frequency. Metal areas and interferences from other devices installed in the wheelchair or nearby may affect this communication, causing the bad operation of the device.
Follow these recommendations to ensure the correct operation of the device:
- Place the emitter far away from interferences from other devices installed in the wheelchair.
- Do not place it close to metal areas to avoid the screening effect.
- Place it accesible enough to be able to connect the charger cable and switches.
- Protect the emitter box from liquids and avoid water entering.
- Tie the cable surplus between emitter and ring to avoid pulls.
Assembly of the Receiver
The receiver is an USB device that must be plugged to the USB port of a computer or to a compatible mobile device using an USB-OTG cable.
Follow these recommendations to ensure the correct operation of the device:
- Use the provided extension cable with cradle to place the receiver in a visible place. Avoid to plug it at the back of the computer.
- Place the receiver far away from interferences from other devices.
- Do not place it close to metal areas to avoid the screening effect.
- Protect the receiver from liquids and avoid water entering
Each device is provided with one receiver paired to the emitter.
One emitter can be paired up to four receivers. If the user wants to access more than one device or devices in different places, it is possible to order more receivers.
IMPORTANT: To learn about the use of the BJOY Ring wireless with compatible smartphones and tablets see section “Use with compatible smartphones and tablets” in the user guide.
Startup
STEP 1.
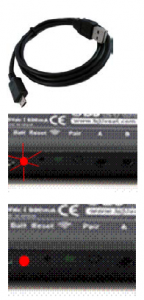
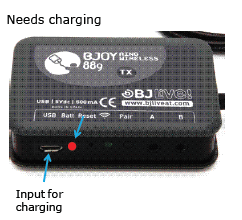
Charge up the emitter’s battery using the micro USB cable connected to the USB port or to the mains with the USB type power supply.
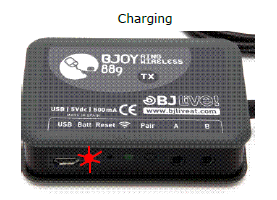
While the battery is charging the battery LED (red) flashes.
When the battery is fully charged the battery LED stops flashing.
The LED turns off when the cable is disconnected.
STEP 2.
Assembly all the parts of the device following the instructions and recommendations given in this document.
Connect the switches to the switch entries if needed.
STEP 3.
Emitter and receiver provided by default are paired.
If the user wants to add more receivers, they should be paired to the emitter. Follow instructions in the user guide to learn how to do it.
STEP 4.
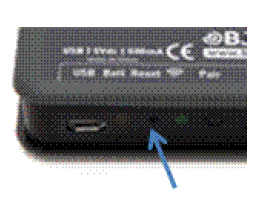
Once the emitter has been fixed to the wheelchair reset the device pressing the reset button to ensure that the device finds the resting position. Do not move the joystick while beeping.
STEP 5.
Calibrate the device using the BJOY configuration program provided in order to improve the device’s response (It is possible to connect the emitter directly to the computer for calibration using the micro USB cable provided).
STEP 6.
Customise the device’s operation to meet the user needs using the BJOY configuration program provided.
How to use
Pointer movement
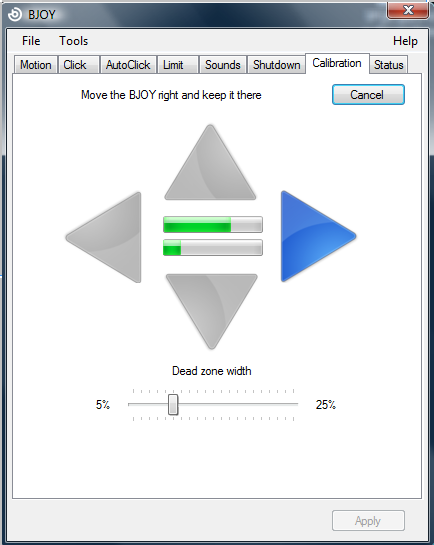
Although the device adapts to the assembly position, it must be calibrated in order to obtain the best response from the joystick’s movements. To perform the calibration:
- Install the BJOY configuration program in you Windows PC.
- Plug the receiver into the computer’s USB port or connect the emitter to the USB port directly using the micro USB cable provided.
- Do the calibration following the instructions of the menu “Calibration” in the configuration program.
Once the calibration is done the device can be used like the joystick of the wheelchair. To move the pointer on the computer screen or the compatible mobile device you just need to move the joystick in the desired direction.
To avoid the pointer moving on the screen when you want to drive the wheelchair, you have to shutdown the mouse (see section “How to shut down the device”).
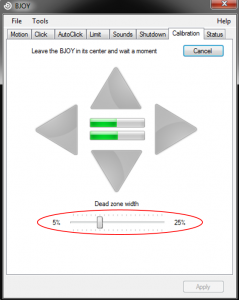
If due to a slight change in the position of the joystick the mouse moves slightly without moving the joystick, the device can be deactivated and then reconnected in order to recognise a new resting position. If this occurs frequently or the position of the wheelchair joystick is not stable, the minimum inclination value can be modified using the “Dead zone width” available in the configuration program (Calibration).
For the correct use of this device, it is recommended:
- Do not use it in moving vehicles.
- Do a calibration if there is a substantial change to the wheelchair joystick’s resting position.
- Do a calibration if irregular behaviour is noted.
How to make the clicks
To make the click use the two external switches which can be connected to the switch entries indicated as A and B in the emitter box. By default these entries are assigned to the following functions:
Entry A: Left click
Entry B: Right click
The functions assigned to each entry can be changed using the configuration program (menu “Click”).
AutoClick
If enabled, this function allows the dwell click for the left click. It can be enabled from the “AutoClick” menu in the configuration program.
It is also possible to adjust the delay time to make the click.
How to shut down the device
There are different ways for shutting down the device:
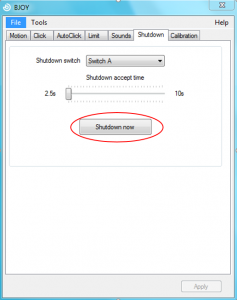
- By means of an external switch. In this case choose which switch input (A or B) will perform the deactivation in the configuration program (“Shutdown” menu). Set also the shutdown accept time. The device will beep twice to warn about being deactivated.
- Using the button “Shutdown now” in the configuration program (“Shutdown” menu). The device will beep twice to warn about being deactivated.
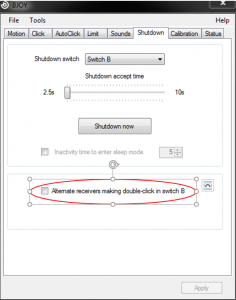
- The device will shut down automatically after several minutes idle. To enable this option select “Inactivity time to enter sleep mode” in the “Shutdown” menu of the configuration program. Set the minutes to be idle before the emitter is deactivated. In this case there is no auditory feedback.
- When there are no receivers in the coverage range the device will become idle. Proceed as in case 3 to set the deactivation of the device. In this case there is no auditory feedback.
When device is shut down:
- Battery power consumption is lower.
- The emitter does not try to connect to any receiver.
- There are no LED indications.
How to activate the device
There are two ways of activating the device after idle or shut down:
- By a switch press. It is strongly recommended for users who use switches. Plug the switch into any of the switch inputs available (A or B) to activate the device. In this case the “accept time” parameter of the “Click” menu in the configuration time is taken into account.
- By making a gesture with the joystick. The gesture consists of moving the joystick through the 4 cardinal points (N, E, S, W) in a time between 0.5 and 3 sec. See figure below:

The gesture can start from any cardinal point, but it is important to maintain the same assembly position in which the device was calibrated and take the joystick to the maximum position in each side, as when it was calibrated.
The activation is followed by a sequence of beeps. Do not move the joystick while the device is beeping.
It is recommended to make the gesture slowly enough to arrive to the 4 points but in a time below 3 seconds. If the device is not activated, repeat the gesture.
IMPORTANT: When the device is connected for the first time to the computer for calibration, press the reset button to activate it. The activation is followed by a sequence of beeps. Do not move the joystick while the device is beeping.
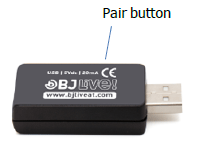
How to add more receivers
One emitter can be paired up to four receivers. By default the product includes one receiver paired to the emitter. To add more receivers follow these steps:
STEP 1.
Plug the receiver into the device you want to control (PC or compatible tablets and smartphones).
To plug the receiver into compatible tablets and smartphones use a USB-OTG cable. (See which tablets and smartphones are compatible in section “Use with compatible smartphones and tablets” of this guide)
STEP 2.
Press the pair button in the receiver. The red LED in the receiver will blink twice, stop for 1 second and blink again.
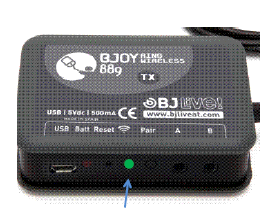
STEP 3.
Press the pair button in the emitter.
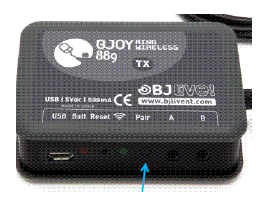
STEP 4.
When emitter and receiver are paired, the red LED of the receiver and the green LED of the emitter will be on for 2 seconds.
Pairing a fifth receiver will delete the first paired receiver and so on.
How to toggle among receivers
BJOY Ring wireless can be used to access up to four different devices. These devices can be located in different environments or in the same environment.
Scenario A: Devices in different environments.

If the receivers are located in different environments (for example in the school and at home) it is not necessary to toggle. The emitter recognises automatically the paired receiver when the user gets closer. This process may take up to 10 seconds. Make sure that the BJOY Ring is activated.
Scenario B: Devices in the same environment.
It is possible to alternate among paired receivers so that the user can access different devices located within the same environment.
There are two ways to alternate among receivers:
- By making the gesture with the joystick. If the emitter is on, the gesture allows toggling among the different paired receivers. The gesture is the same as for activating the device explained in section “How to activate the device”. Before making the gesture, make sure that the BJOY Ring is activated. The emitter will recognise automatically the next receiver within the coverage range. A triple beep warns the user that the receiver has been toggled. If this does not occurred repeat the gesture.
In case there are more than two receivers paired to the transmitter, it will connect with the receivers in the same order as they were originally paired. If there are no receivers in the coverage range, after a few seconds, the emitter will connect to the same receiver. If operating the BJOY Ring as a wired device, it is not possible to alternate among different receivers and the user will be able to work only with the device connected to the BJOY. The use of a gesture is recommended only for users who do not use switches.

- By double press in switch B. To toggle among receivers by making a double press in switch B enable the option “Alternate receivers making double-click in switch B” in the configuration program (menu “Shut down”). Enabling this option will deactivate the use of the gesture to toggle.
IMPORTANT: When the device is activated after shut down or idle, it will connect to the last connected receiver if this receiver is within the coverage range.
Operation as a wired device
The BJOY Ring wireless can operate as well as a wired device.
To operate it as a wired device connect the emitter to the USB port of the computer or compatible tablet/smartphone using the micro USB cable provided.
When wired:
- The wireless function is deactivated. The mouse will work only with the device to which it is connected.
- Battery is charging
Software configuration
The BJOY configuration software allows you to configure the mouse behavior according to the user needs.
Installation
STEP 1.
Insert the CD included with the BJOY mouse in the CD-ROM drive of your computer or download the exe file from: Software BJOY
NOTE: If using the CD and your computer does not have CD-ROM, you can copy the CD contents on a USB stick or any other removable drive.
STEP 2.
If using the CD the installation should begin automatically. If it does not, browse to the CD or removable drive and click on exe file. If using the web page, go to section “Downloads” and click on “BJOY Software”. Save the BJOYSetup.exe file in your computer and double click to start installation.
STEP 3.
When the installation begins the wizard will guide you through the process. It is recommended to close all other programs during the process. You must click “Next” to continue.
STEP 4.
You can choose a different path for the installation file and create a shortcut to the program in the Start Menu and Desktop.
STEP 5.
Once you have selected your installation preferences, click “Install” to install the program on your computer.
STEP 6.
Once installation is completed, click “Finish” to exit.
Configuration options
IMPORTANT: In order to access to the multiple settings options you must have a BJOY device connected to your computer.
In case you do not have any BJOY device connected the following screen will appear:
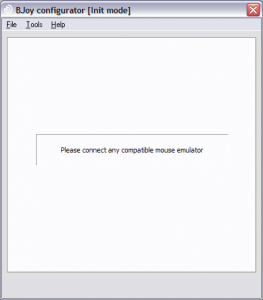
Fig. 5. BJOY configurator.
IMPORTANT: if you want that changes done are applied to the BJOY device, the “Apply” button that appears at the right bottom of the window must be clicked.
The instructions for using the BJOY Software are available from the “Help” menu.
Shutdown
In the event that you want to configure the deactivate/activate option of the BJOY Ring mouse, select the “Shutdown” tab. This configuration allows you to deactivate the movement of the cursor while you are moving the wheelchair.
Select from the “Shutdown switch” drop-down list the entry which you want to deactivate the device with.
If you have selected entry A or B, you can adjust the necessary time that the corresponding entry has to be activated so that the device is activated/deactivated. Select the desire time from the bar: “Shutdown accept time”.
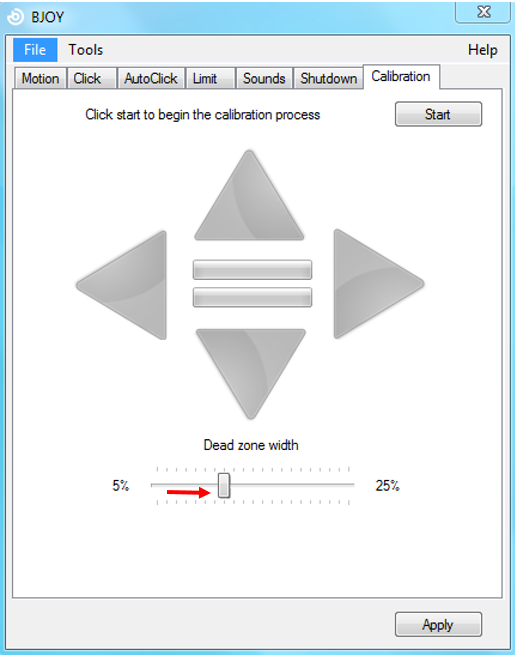
Calibration
You must do a calibration whenever there is a change in the assembly position of the BJOY Ring or improper behaviour is noted. In this case select the “Calibration” tab.
In order to calibrate the BJOY activate the “Start” button and follow the steps indicated in the screen.
In the event that small movements in the wheelchair’s joystick cause undesired cursor movements, you can eliminate them by increasing the “Minimum inclination” value. The higher this value, the more the joystick will have to be inclined in order for the cursor to move.
Save a customize setting
To save a setting after making any customization, follow these steps:
STEP 1.
Select the “File” menu.
STEP 2.
Select “Save Settings”.
STEP 3.
In the next screen, assign a name and a location to save the file. Accept making click on the “Save” button.
Loading a configuration
To reload a saved configuration in order to modify it or save it in the device, follow these steps:
STEP 1.
Activate the “File” menu.
STEP 2.
Select “Load settings”
STEP 3.
Find the file corresponding to the stored configuration (files are saved with the extension “. BJOY.” Click on the “Open” button in the same screen.
To load the configuration on the device you must click on the “Apply” button.
Language settings
To change the language of the program, just follow these steps:
STEP 1.
Activate the “Tools” menu.
STEP 2.
Select “Change language”.
STEP 3.
Choose your preferred language and validate clicking the “Accept” button.
Battery Care & Maintenance
Battery charging
The battery needs charging when the red LED on the emitter starts flashing. It is possible to configure an acoustic warning selecting “Low battery sound” in the “Sounds” menu of the configuration software. In this case the device will beep 3 times every hour and the beeping will start 3 hours before the battery is fully discharged.
To check the battery’s status go to the menu “Status” in the configuration program.
To charge the device, follow these steps:
STEP 1.
Connect the charger cable to any computer USB port or to the charger supplied with the product.
STEP 2.
During charging, the LED will flash red. The LED will turn red permanently when the battery is fully charged. Then it must be disconnected from the charger.
When the charging cable is disconnected, the LED switches itself off and the device returns to stand by mode, ready for use.
IMPORTANT: During a standard use, it is recommended to charge the device once a day.
Battery care
- The battery installed in the device is a single lithium ion polymer cell. The battery will discharge slowly even if the device is not in use. It is possible to find the battery discharged when buying the product depending on the storage time. In this case it is necessary to perform a full battery charge before the first use.
- Ion polymer batteries cannot withstand temperature excesses. For this reason:
- Do not leave the remote near heat sources such as radiators, electric blankets, heaters, etc.
- Never leave the remote inside vehicles.
If it overheats, the battery could catch fire.
- Only charge the battery with the charger supplied with the product or through a USB port. The charging process must be witnessed in order to detect any charging abnormalities.
- Use the battery and charger for their intended purposes only. Improper use or use of unapproved batteries or chargers may present a risk of fire, explosion, or other hazard, and may invalidate any approval or warranty.
- The battery can be charged and discharged countless times but it will eventually wear out. You will need to replace the battery when the battery life is noticeably shorter than normal. To do this, contact BJ Adaptaciones to replace it.
- The full charging time of the battery can vary between 4 and 5 hours.
- Lithium-ion polymer batteries can be charged before they are fully discharged because they are not susceptible to the memory effect. We do not recommend charging the battery before it has lost 5% of its charge. This will cut down on unnecessary charging that can be harmful due to the increase in temperature. Charging and discharging quickly and often will increase the inaccuracy between the battery charge status and power meter readings.
- Leaving the battery at a high level of charge in a high-temperature environment for extended periods (> 60°C) also accelerates the loss of capacity.
- Frequent full charges and discharges put stress on the battery and drastically reduce its lifespan.
- Try to keep it between 15°C and 25°C (59°F and 77°F). Extreme temperatures reduce the capacity and lifetime of the battery. A device with a hot or cold battery may not work temporarily.
- When the battery is fully charged, disconnect it from the charger, as overcharging may shorten the battery’s lifetime.
- The correct way to disconnect the device from an external power supply is, firstly, to unplug the cable from the socket transmitting the electricity to the power supply/equipment charger. You may then remove the connector socket directing the voltage to the actual equipment.
- You should do this the other way round when connecting to the power supply.
- When you unplug a charger or an accessory, hold and pull the plug, not the cord.
- When your charger is not in use, unplug it from the electrical plug and the device.
- Do not use the charger outdoors.
- If you believe the battery or charger is damaged, contact your supplier to have it inspected before continuing to use it. Never use a damaged charger or battery.
Troubleshooting
1. Mouse pointer moves without touching the joystick
If you notice that the mouse pointer moves without you moving the joystick follow these steps:
- Make sure ring is properly mounted and fixed.
- Make sure the structure upon ring is mounted is properly fixed.
- BJoy is properly calibrated.
- Increase parameter “dead zone width”
2. Device does not power up
- Verify charger and charging cable: try to charge another device (e.g. smartphone) to ensure the charger is working properly.
- If it does not charge, charger is not working. Try to charge BJoy Ring using a new functioning charger.
Important: Charger must indicate “5V/1A”.
3. If charger works properly, connect it to BJoy Ring and check whether the red LED blinks. If it does not blink, BJoy transmitter is not working.
3. Mouse does not move as it should do
If the movement of the pointer does not match joystick’s movements, put the device in “sleep mode” (see below image) and activate it again so that the device starts beeping.
IMPORTANT: During the beeping, device is recognizing the mounting position so during this time joystick should not be moved.
NOTE: If mounting position does not change, there is no need to recalibrate.
F.A.Qs
1. Duration of the battery
2. Are settings made to BJoy transferable between devices?
3. How many times do I need to calibrate it?
Calibration is only needed once, even if the device runs out of battery. As long as the Bjoy’s mounting position remains the same, calibration is valid.
4. How to deactivate the toggle gesture (“4 cardinal points gesture”) on the joystick.
If you are using a switch to turn on and off the device and have no need to use the “4 cardinal points gesture”, you can avoid unintentional wheelchair’s wake-up by clicking on the option “Alternate receivers making double-click in switch B” , in tab “Shutdown“.
5. How much can the wheelchair be leant back?
- Perform calibration while wheelchair is it’s the most common leaning position.
- If wheelchair is going to be leant back:
- Deactivate BJoy Ring
- Place wheelchair in the desired position
- Activate again BJoy Ring to enable allow it to recognize the new position
IMPORTANT: When BJoy Ring is restarted it starts beeping. Please do not move the joystick during these beeps.
At this point the device should work properly without recalibrating it.
NOTE: If there is a lot of difference between current and original wheelchair’s position deveice might need recalibration (maximum recommended tilt is 45º).
6. Is there any adjustment helping with situations of much trembling?
In these cases we suggest to increase the value of “Dead zone width” within “calibration” tab (see below image). Depending on its value, this parameter allows that joystick’s movement does not directly translates into movement of the pointer.
7. Is BJoy Ring compatible with smpartphones and tablets iOS?
Apple’s tablets and smartphones do not support mouse pointer as an access method. Since BJoy Ring emulates the functioning of a mouse, these devices are not compatible.
Only devices with Windows, Android and Mac (laptops and desktop) are compatible with BJoy Rings.
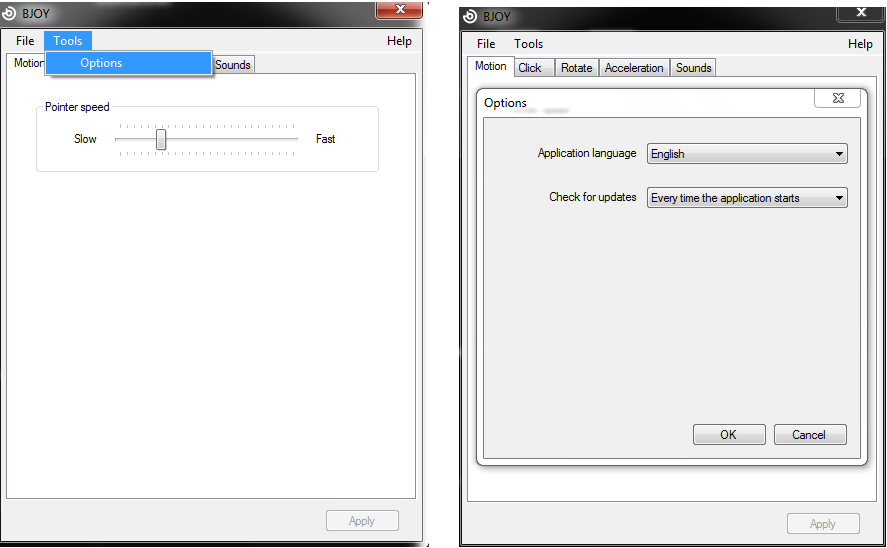
8. How to select a language
- Open BJOY software
- Click on “Tools” > “Options”
- Select desired language from the drop-down menu “application language”
9. ¿Can a BJoy be connected to an Android smartphone or tablet?
It is possible to use BJoy with smartphones and tablets running on a compatible Android operating system. To do that, connect either transmitter or receiver using a USB-OTG cable (not provided).
Android devices must have:
- USB Host o USB-OTG connection (almost every new Android devices have them).
- Control buttons embedded in the screen (“back”, “home” “multifunction”), this way you will be able to manage all your device’s functionalities using BJOY.
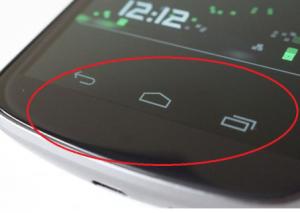
NOTE: users who do not have control buttons embbeded into the screen can experience access limitations. However, exists software in the market that emulates phisical contact buttons in the screen. If this is your case and you need technical support please contact us.
3. Movile device must run at least on a 3.2 Android version or higher.
NOTE: To ensure optimal performance of the BJOY Ring using your movile device please take into account that it must be calibrated and configured using BJOY’s software in PC running on Windows.
10. Can a BJoy be connected to an iOS device?
BJoy can be connected to an iOS device that allows mouse access (only laptops and desktop computers. Tablets and smartphones do not have mouse access functionality enabled).
11. ¿Is there an iOS version of BJoy’s software?
No, an iOS version of BJoy’s software has not been developed. However, BJoy device can be configurated into a Windows operating system device and since the configuration is stored inside the BJoy, it can be later connected into an iOS device that allows mouse access (laptop or desktop. Tablets and smartphones do not offer this access method).